

Gardening is more than just a hobby—it’s a rewarding experience that brings you closer to nature, enhances your well-being, and can even help you grow your own food. Whether you’re dreaming of vibrant flower beds or a lush vegetable patch, starting your garden doesn’t have to be intimidating. With the right guidance and some patience, anyone can cultivate a thriving green space.
In this guide, we’ll walk you through 10 simple and practical steps to start your own garden successfully—even if you’re a complete beginner. Along the way, you’ll also learn how regular garden maintenance plays a key role in keeping your garden healthy and flourishing.
Step 1: Choose the Right Location For Gardening

The foundation of every successful garden begins with selecting the right spot. This decision will influence how well your plants grow, how much effort is required to maintain them, and even how much enjoyment you get from your garden. Whether you’re planning a vegetable patch, a herb corner, or a vibrant mix of flowers, the right location makes all the difference.
???? What to Consider:
- Sunlight: Most plants—especially fruits, vegetables, and flowering varieties—require 6–8 hours of direct sunlight each day. Spend time observing your chosen area throughout the day to ensure it receives adequate exposure. If you’re unsure, consider using a sunlight meter or noting where shadows fall during morning, midday, and afternoon.
- Drainage: Waterlogged soil can lead to root rot and attract pests. Avoid areas where rainwater tends to collect. Test your soil by digging a small hole and filling it with water—if it drains within a few hours, the location is suitable. If the space has accumulated organic debris or excess soil that’s impeding drainage, consider garden waste clearance to help tidy the area and restore proper flow.
- Wind Exposure: Strong winds can break stems, strip leaves, and dry out soil rapidly. Try to choose a spot that has natural windbreaks, such as fences, hedges, or walls. If none exist, you can create your own using trellises or strategically placed plants.
- Accessibility: Your garden should be convenient to access for regular watering, weeding, pruning, and harvesting. If it’s too far away or difficult to reach, you may find yourself neglecting it unintentionally. Ease of access will also make routine grounds maintenance more manageable.
- Space Efficiency: If you’re short on yard space, don’t worry. Container gardening is an excellent option for patios, balconies, rooftops, and even windowsills. Many herbs and compact vegetables like cherry tomatoes or lettuce thrive in pots and hanging baskets.
Choosing a location with these elements in mind sets your garden up for long-term success. The goal is to find a balance between what your plants need and what works best for your lifestyle and environment.
Step 2: Decide What to Grow in Garden
Once you’ve chosen the perfect spot for your garden, the next step is deciding what to plant. This decision should be guided by your personal tastes, the local climate, the amount of sunlight your space receives, and the time you can dedicate to maintenance. Whether you’re growing for beauty, food, or both, choosing the right plants will make your gardening experience more enjoyable and successful.
???? Great Options for Beginners:
- Vegetables: Start with easy-to-grow, quick-yielding crops like tomatoes, lettuce, radishes, cucumbers, and green beans. These are resilient, rewarding, and perfect for small garden plots or containers.
- Herbs: Fresh herbs are not only fragrant and useful in the kitchen but also compact and low-maintenance. Popular starter herbs include basil, parsley, mint, rosemary, and thyme.
- Flowers: If you’re after a splash of colour, consider marigolds, sunflowers, petunias, and zinnias. These flowers are known for their hardiness and ability to thrive with basic care.
???? Tips for Choosing Plants:
- Start Small: It’s easy to get carried away, but starting with a few varieties helps you learn what works best without becoming overwhelmed. You can always expand your garden as you gain confidence.
- Know Your Zone: Look up your USDA Hardiness Zone (or local equivalent) to understand what plants are most likely to thrive in your area’s climate.
- Mix and Match: Combining vegetables and flowers can be both beautiful and functional. Some flowers attract beneficial insects that support pollination and naturally deter pests.
- Think Seasonally: Choose a mix of plants that bloom or produce at different times to ensure your garden stays lively across the seasons.
With thoughtful planning and the right selections, your garden will become a space that reflects your tastes and supports your lifestyle. For those based in Merseyside or surrounding areas, having a reliable Gardening service in Liverpool can be a great resource for inspiration and seasonal planting ideas.
Step 3: Plan Your Garden Layout
Before you start digging, take a moment to design your garden’s layout. A simple sketch—whether on grid paper or with an online garden planner—can help you visualize where everything will go and ensure you’re using your space wisely. Planning ahead also makes it easier to manage plant health, maximize yields, and maintain a visually appealing garden.
???? Layout Tips to Keep in Mind:
- Group by Height: Arrange plants by their mature height. Place taller plants (like corn or sunflowers) at the back of the garden or in the center of circular beds, and keep shorter plants (like lettuce or herbs) in front. This ensures all plants receive enough sunlight and won’t be overshadowed.
- Use Companion Planting: Some plants grow better when paired with the right companions. For example, basil can enhance the flavour of tomatoes and repel pests, while marigolds can deter nematodes and aphids. A well-thought-out companion planting strategy can reduce the need for chemical pest control and boost your harvest.
- Choose a Structure: Rows vs. Beds:
- Row Gardening: Traditional and simple, rows are ideal for large plots and make walking between plants easy.
- Raised Beds: Great for small or uneven spaces, raised beds offer better drainage, soil control, and can reduce back strain during maintenance.
- Respect Spacing Guidelines: Overcrowding is a common mistake that can lead to poor airflow, increased disease risk, and competition for nutrients. Always follow the recommended spacing on seed packets or plant tags to give each plant the room it needs to thrive.
- Clear Debris for Best Results: Before planting, clearing away old leaves, stems, and other garden debris helps prevent pests and diseases. If you find yourself with a lot of organic waste, consider using a professional garden waste clearance service to keep your garden tidy and healthy.
- Think About Access: Leave space for walking paths, watering, and harvesting. If you can’t easily reach the center of your bed or row, you’ll likely end up stepping on soil—which can compact it and affect root growth.
Planning your layout may seem like an extra step, but it pays off in the long run. A thoughtful design makes planting, weeding, and harvesting more efficient, and helps create a more harmonious garden both in function and appearance.
Step 4: Prepare Your Soil For Gardening

Soil is truly the heart of any successful garden. Healthy, nutrient-rich, and well-draining soil provides the foundation your plants need to grow strong and resilient. Taking the time to properly prepare your soil will pay off with better growth, higher yields, and fewer problems down the line.
???????? Steps to Prepare Your Soil:
- Clear the Area: Begin by removing weeds, rocks, old roots, and any debris that might interfere with plant growth. This essential cleanup helps create a clean slate and reduces competition for nutrients. Routine grounds maintenance practices often include soil clearing to keep your garden in prime condition.
- Loosen the Soil: Use a spade, garden fork, or tiller to break up the soil to a depth of about 12 inches (30 cm). Loosening the soil improves aeration and allows roots to penetrate deeply, encouraging robust growth.
- Add Organic Matter: Enrich your soil by mixing in organic materials such as compost, well-rotted manure, or peat moss. These additions improve soil structure, water retention, and nutrient content, creating a fertile environment for your plants.
- Test Soil pH: Use a soil test kit to check the pH level. Most plants prefer a slightly acidic to neutral range between 6.0 and 7.0. Knowing your soil’s pH will help you make informed adjustments.
- Amend Soil as Needed: If your soil is too acidic, add lime to raise the pH. If it’s too alkaline, sulfur can help lower the pH. Adjusting pH optimizes nutrient availability and promotes healthy plant development.
Preparing your soil thoroughly sets a strong foundation for the entire gardening season. Healthy soil leads to healthy plants — so invest the effort now, and your garden will thank you with vibrant blooms and bountiful harvests.
Step 5: Choose the Right Gardening Tools
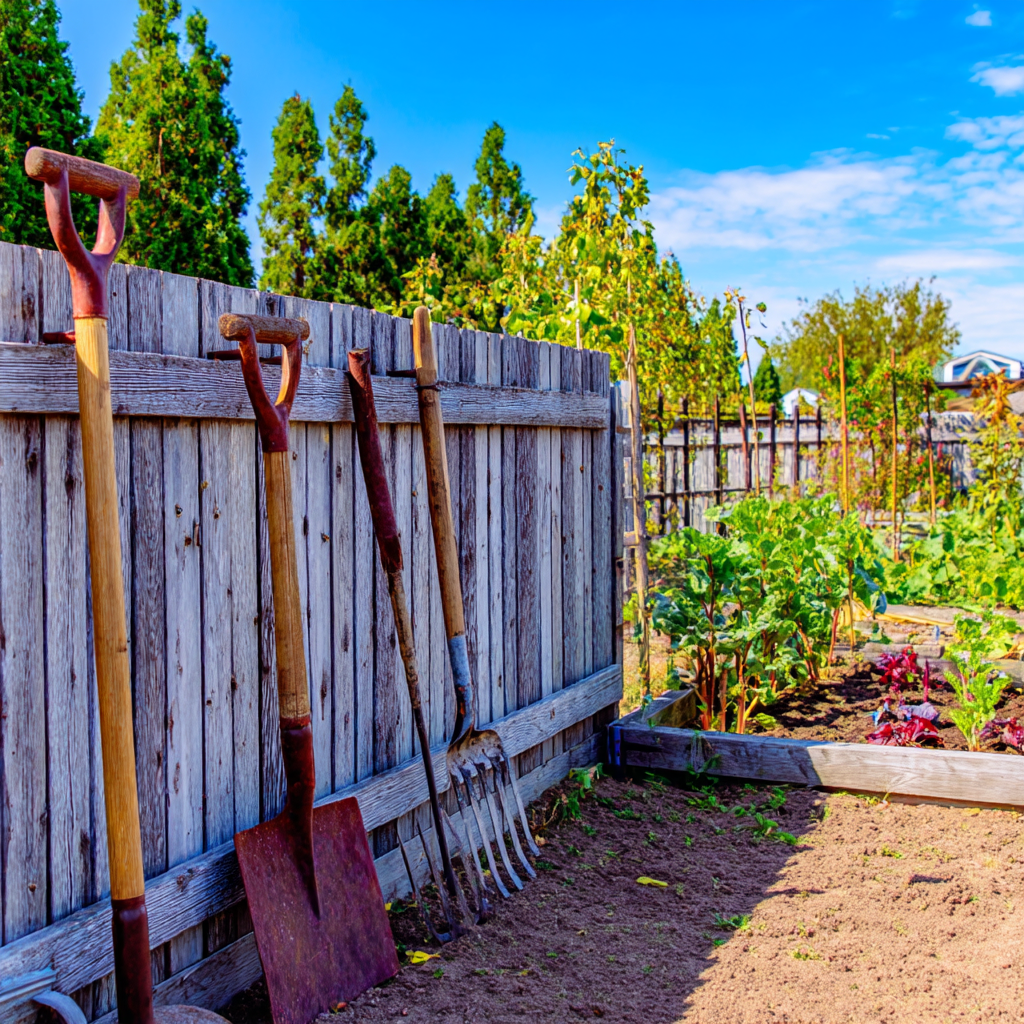
Having the right tools on hand can make all the difference between a frustrating gardening experience and an enjoyable, productive one. Even if you’re just starting out, investing in a few essential gardening tools will save you time and effort while helping you care for your plants more effectively.
????️ Essential Gardening Tools for Beginners:
- Gloves: Protect your hands from thorns, dirt, blisters, and potential irritants. Choose gloves that fit well and are durable yet breathable.
- Hand Trowel: A versatile tool perfect for digging small holes, transplanting seedlings, and mixing soil or fertilizer in pots and beds.
- Watering Can or Hose: Consistent watering is key to plant health. A watering can is great for container gardens or delicate seedlings, while a hose with a spray nozzle works well for larger areas.
- Pruners (Secateurs): These are used to trim dead or overgrown branches, promote healthy growth, and keep your plants tidy.
- Garden Fork: Ideal for loosening and aerating soil, breaking up compacted earth, and mixing compost into the soil.
- Rake and Shovel: A rake helps smooth soil and clear debris, while a shovel is necessary for digging larger holes, planting trees, or turning over soil.
Using these basic tools will make your gardening routine easier and more enjoyable. As you gain experience, you might find yourself adding more specialized equipment, but these essentials are a perfect starting point for any beginner.
Step 6: Start Planting – Your Gardening Journey Begins
Now comes the exciting part of gardening—getting your hands in the soil and planting your chosen seeds or seedlings! This step marks the beginning of your garden’s growth journey, so doing it right will set the stage for a healthy and productive garden.
???? When to Plant:
- Spring: Ideal for most vegetables, annual flowers, and herbs. As the soil warms and frost risk fades, plants can establish themselves before summer.
- Fall: Perfect for perennials, shrubs, and cool-weather crops like kale, spinach, broccoli, and lettuces. Fall planting helps these plants develop strong roots before winter.
???? How to Plant:
- From Seeds: Follow seed packet instructions on planting depth and spacing. Planting at the right depth improves germination and healthy growth. Lightly cover seeds and gently press the soil.
- From Seedlings: Dig a hole slightly larger than the root ball, place the plant at the same soil level as before, then backfill and firm the soil.
???? Pro Tip:
Water immediately after planting to settle the soil and hydrate the roots.
Applying simple garden landscaping design ideas can help you organize your plants to create a beautiful and functional gardening space.
Step 7: Water Wisely – Mastering the Art of Gardening Hydration

Watering your garden is much more than just a simple task—it’s a crucial skill that can make or break the health of your plants. Understanding when, how, and how much to water helps ensure your garden thrives while conserving water and preventing common problems.
???? Best Watering Practices:
- Water Early in the Morning:
Watering your garden in the early morning is ideal because cooler temperatures mean less water evaporates before it soaks into the soil. Morning watering also gives leaves a chance to dry throughout the day, reducing the risk of fungal diseases and mildew. - Deep, Infrequent Watering:
Instead of frequent shallow watering, aim to water deeply but less often. Deep watering encourages roots to grow downward, making plants more drought-resistant and stable. Shallow watering, on the other hand, can lead to weak roots that stay near the surface and dry out quickly. - Use Efficient Watering Methods:
Soaker hoses and drip irrigation systems deliver water directly to the base of plants, minimizing water waste and keeping leaves dry. Keeping foliage dry helps prevent many common plant diseases. - Adjust for Plant Needs:
Different plants have different watering requirements. Succulents and drought-tolerant plants need much less water than thirsty vegetables like tomatoes or cucumbers. Keep an eye out for signs like yellowing leaves, wilting, or drooping to know if you’re over- or under-watering. - Keep Your Garden Clean:
Sometimes, garden paths, patios, and hard surfaces can get dirty or clogged with moss and algae, affecting water drainage and plant health. Regular maintenance, including pressure jet washing services, can help keep your garden tidy and water flowing properly.
Mastering watering techniques takes a little practice, but it’s one of the most rewarding parts of gardening. With careful attention, your plants will stay healthy, hydrated, and vibrant all season long.
Step 8: Mulch for Moisture and Weed Control – Boost Your Garden’s Health
Mulching is one of the easiest yet most effective ways to support your garden’s growth and reduce maintenance. By adding a layer of mulch around your plants, you create a protective barrier that benefits both soil and plants in several important ways.
???? Why Mulch?
- Retains Soil Moisture:
Mulch helps keep the soil moist by reducing evaporation, meaning your plants don’t dry out as quickly—especially during hot or dry weather. - Prevents Weeds:
A thick layer of mulch blocks sunlight from reaching weed seeds, which helps reduce unwanted competition for nutrients, water, and space. - Moderates Soil Temperature:
Mulch acts as insulation, keeping soil cooler in the summer and warmer during colder months, which helps maintain steady growing conditions. - Adds Nutrients to the Soil:
Organic mulches like shredded bark, straw, grass clippings, and compost break down over time, enriching the soil with valuable nutrients and improving its structure.
???? How to Apply Mulch:
- Spread a 2–3 inch (5–7.5 cm) layer of mulch evenly around your plants.
- Keep the mulch a few inches away from plant stems or trunks to prevent moisture buildup and rot.
- Replenish mulch as needed, especially after heavy rains or seasonal changes.
Incorporating mulching into your gardening routine aligns well with good landscaping and gardening services in Liverpool practices to maintain healthy, vibrant outdoor spaces.
Step 9: Maintain and Monitor – Keep Your Garden Thriving
A successful garden isn’t just about planting—it’s about consistent care and attention. Regular maintenance helps your plants stay healthy, prevents problems before they escalate, and lets you enjoy the rewards of your hard work.
???? Maintenance Tips:
- Weed Regularly:
Pull weeds by hand as soon as you spot them. Removing weeds early prevents them from spreading and competing with your plants for water, nutrients, and sunlight. - Prune and Deadhead:
Trim back overgrown branches and remove spent flowers (deadheading) to encourage new growth and extend blooming periods. This keeps your garden looking neat and vibrant. - Fertilize as Needed:
Feed your plants with organic or slow-release fertilizers according to their specific needs. Proper feeding supports healthy growth and abundant harvests. - Inspect for Pests and Diseases:
Check under leaves, along stems, and at the base of plants regularly for signs of pests or diseases. Early detection means easier treatment and less damage. - Garden Journaling:
Keeping a garden journal to track what works well, what challenges you face, and seasonal changes can be invaluable for planning future gardening success.
Also, remember that keeping the wider garden environment clean and well-maintained supports plant health—routine tasks like gutter cleaning can help prevent water damage and improve drainage around your garden.
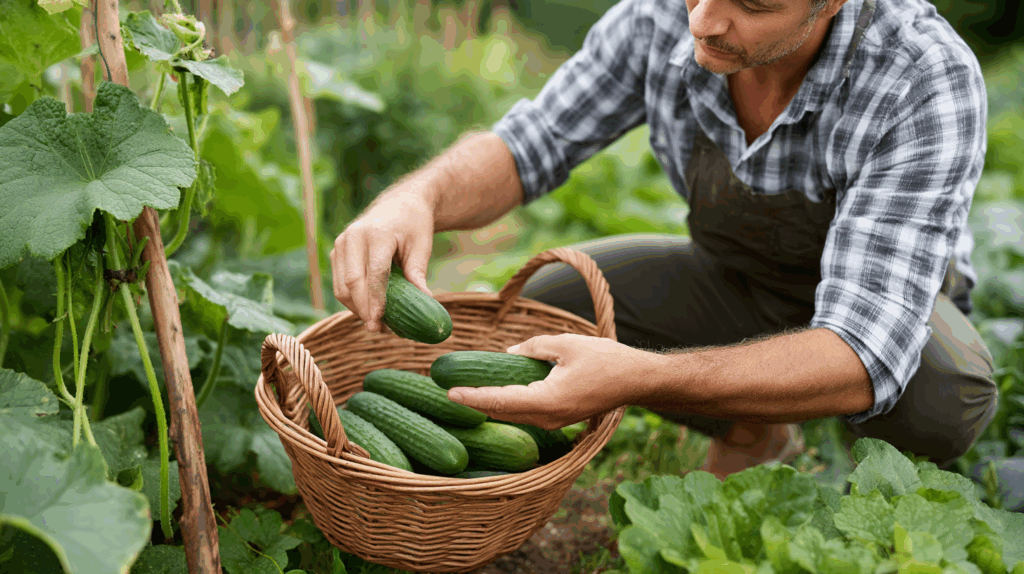
Step 10: Harvest and Enjoy – Celebrate the Fruits of Your Gardening Labor
After weeks or months of care, watering, and watching your garden grow, the most rewarding part finally arrives—harvesting and enjoying your plants. Whether you’ve grown vibrant vegetables, fragrant herbs, or beautiful flowers, this is your moment to appreciate all the hard work you’ve put in.
???? Harvesting Tips:
- Vegetables:
Pick vegetables when they’re fully ripe but before they become overripe or start to spoil. Harvesting regularly encourages plants like tomatoes, beans, and cucumbers to keep producing throughout the season. For root vegetables like carrots and radishes, pull them when they reach the desired size. - Herbs:
Snip herbs regularly to promote bushier growth and prevent flowering, which can reduce flavor. Use sharp scissors or pruning shears to make clean cuts, usually from the top or outer leaves. Fresh herbs taste best when harvested just before use. - Flowers:
Cut flowers early in the morning when their stems are fully hydrated. Use sharp garden scissors or shears and cut at an angle to allow better water uptake in the vase. Regularly deadheading (removing spent blooms) encourages some flowers to bloom longer.
???? Enjoying Your Garden:
Harvesting is also a time to slow down and savor the beauty and bounty your garden provides. Share fresh produce or flowers with family, friends, or neighbors to spread the joy. Capture the colors and growth progress by taking photos, or even consider starting a garden journal or blog to document your journey and tips.
Remember, gardening is a continuous cycle—once you harvest, you can plan your next planting and keep your garden flourishing season after season. The satisfaction of enjoying what you’ve grown is truly unmatched.